
Have you ever taken a photo that looked just okay, but you knew it could look amazing? The secret to making a good photo look great is often how you cut it. In the photography world, we call this “cropping.”
When you crop a picture, you are doing more than just making it smaller. You are choosing what the viewer gets to see. You are telling a story. Today, many people edit their photos on their phones. Maybe you use a custom Lightroom Mod APK to unlock fun premium filters, or maybe you just use the standard free Lightroom APK for quick edits on the go. Both of those mobile apps are super helpful.
But when you want to do serious, professional photo editing, you sit down at your computer and open Adobe Lightroom Classic.
Lightroom Classic has tools that are incredibly powerful. One of the best tools is the Crop Overlay tool. But here is a secret that many beginners do not know: Lightroom does not just have one crop grid. It actually has seven different grids hidden inside it!
In this massive, easy-to-read guide, we will teach you exactly how to change the crop grid in Lightroom Classic. We will also explain what every single grid does and how to use them to make your pictures look like they were taken by a pro.
Let’s get started!
Chapter 1: Why Do We Even Need a Crop Grid?
Before we learn how to change the grid, we need to understand why it is there. What is the point of putting lines all over your beautiful picture?
When you take a photo, you are capturing a moment. But sometimes, extra things get into the frame. Maybe there is a trash can in the corner of your beautiful beach photo. Maybe a random person walked into the background. Cropping helps you cut out the messy stuff.
But it is also about something called composition. “Composition” is just a fancy art word that means “how things are arranged.”
Imagine you are at a big cricket match. You take a picture of a star batsman, like Babar Azam, hitting a perfect cover drive. If you put him dead in the middle of the photo, the picture might look a little bit boring. The viewer’s eye just stops in the center.
Or, imagine you are walking down the street and see a sleek, shiny luxury sports car. You snap a photo. If the car is right in the middle, it looks like it is parked. But if you put the car near the bottom right corner and leave an empty space in front of it, suddenly the car looks like it is zooming forward!
This is what a crop grid does. The lines on the screen are guides. They tell you exactly where to put your subject so the photo looks exciting, balanced, and perfect.
Chapter 2: How to Find the Crop Tool
To change the grid, you first need to know how to open the crop tool. It is very simple.
- Open Lightroom Classic: Start the program on your Mac or Windows computer.
- Go to the Develop Module: Look at the top right corner of your screen. You will see words like “library,” “develop,” “map,” and “book.” Click on the word “Develop.” This is the room where all the editing magic happens.
- Find the Tool: Look at the panel on the right side of your screen. Right under the colorful graph (called the histogram), there is a row of small icons.
- Click the Dotted Square: The very first icon on the left looks like a square made of dotted lines. This is the Crop Overlay tool. Click it.
Pro Keyboard Shortcut: Want to look like a real computer wizard? You don’t even have to use your mouse. Just press the letter R on your keyboard while you are in the Develop module. The crop tool will open instantly!
Once the tool is open, you will see a box appear over your photo with lines inside it. Now, it is time for the fun part.
Chapter 3: How to Change the Crop Grid (The Magic Shortcut)
This is the main reason you are reading this article. You are tired of looking at the same tic-tac-toe grid every time you edit. How do you change it?
The button to change the grid is completely invisible. It is a hidden secret that you can only unlock with your keyboard.
Here are the step-by-step instructions:
- Make sure your Crop tool is open (press R).
- Look at your keyboard.
- Press the letter O. (The letter O stands for “Overlay.”).
That is it! Every single time you press the letter O, the grid on your screen will magically change to a brand-new shape.
Try it right now. Tap O. Tap it again. Keep tapping it. You will see the lines dance and change into triangles, small boxes, and even a shape that looks like a seashell. Just keep tapping the key until you find the specific grid you want to use for your photo.
How to Flip the Grid (Shift + O)
Sometimes, you will find the perfect grid, but it is facing the wrong way.
For example, there is a grid called the Triangle grid. Let’s say the main lines of the triangle are pointing to the left side of your photo. But the person in your photo is standing on the right side! What do you do?
You flip it!
To flip a grid, simply hold down the Shift key on your keyboard and then tap the letter O (Shift + O).
This will flip the grid upside down or backwards. Keep holding Shift and tapping O until the grid lines up perfectly with the subject in your picture.
Chapter 4: What Does Every Grid Do? (The 7 Grids Explained)
Now you know the magic keyboard shortcut. But when you press the letter O, what are you actually looking at?
Lightroom Classic gives you seven different tools for framing your art. Let’s look closely at what every single one means and when you should use it.
1. The Rule of Thirds Grid
This is the most famous grid in the world. When you open the crop tool for the very first time, this is the grid you see. It looks exactly like a tic-tac-toe board. Two lines are going up and down, and two lines are going side to side.
- How to use it: Look at the four spots where the lines cross each other. These spots are called “power points.” When you crop your photo, try to put the most important thing (like a person’s eye or a dog’s nose) right on one of those four dots.
- When to use it: Use this for almost everything! It makes portraits, landscapes, and pet photos look incredibly balanced.
2. The Standard Grid (Graph Paper)
If you press O again, the tic-tac-toe board turns into a grid with lots and lots of tiny squares. It looks just like the graph paper you use in math class.
- How to use it: This grid is not really for placing your subject. It is for making things straight.
- When to use it: Have you ever taken a picture of the ocean, and the water looks crooked, like it is going to spill out of the photo? Open this grid. Line up the horizontal lines with the ocean water to make it perfectly flat. It is also amazing for photos of tall buildings or brick walls. You can use the straight lines to make sure the building is not leaning over.
3. The Diagonal Grid
Press O again. Now you will see a big box with lines cutting sharply across the corners from the top to the bottom.
- How to use it: Diagonal lines make human brains feel energy. Straight lines feel calm, but diagonal lines feel fast.
- When to use it: Use this grid when you want to show speed. Remember our example of the luxury sports car? If you line up the shape of the car or the road with these angled lines, the picture will suddenly feel like it has movement. It is great for action shots, running kids, or sports.
4. The Triangle Grid
This one looks a bit messy at first. It takes your photo and slices it into large, angled triangles.
- How to use it: This grid helps you balance a photo that has a lot of heavy stuff on one side. You try to put the most important part of your photo in the biggest triangle, and less important things in the smaller triangles.
- When to use it: This is an advanced trick. Photographers use it when taking pictures of mountains, or when they are taking a portrait of a person who has their arms crossed or bent in a shape. Don’t forget, you can press Shift + O to flip the triangles around!
5. The Golden Ratio Grid
When you press O to reach this grid, you might get confused. It looks almost exactly like the Rule of Thirds tic-tac-toe board. But if you look very closely, the lines are squeezed together in the middle. The center box is much smaller than the outside boxes.
- How to use it: The Golden Ratio is a mathematical rule that was discovered hundreds of years ago. Famous painters used it to make art that humans naturally find beautiful. You use it just like the Rule of Thirds, but it pulls the viewer’s eyes much closer to the center of the picture.
- When to use it: Use this for close-up portraits of faces or macro photography (like a super close-up picture of a flower or an insect).
6. The Golden Spiral
This is the coolest-looking grid in Lightroom. When it pops up, it looks like a giant seashell or a snail shell spinning around your photo.
- How to use it: The spiral starts wide on the outside of your photo and curls tightly into a tiny circle. You want to place the most important part of your photo right inside that tiny, tight circle. Then, you want the rest of your photo to follow the sweeping curve.
- When to use it: This is perfect for “leading lines.” For example, if you take a picture of a winding road, you can make the road follow the curve of the shell, and put a person standing at the very end of the road inside the tiny circle. It forces the viewer to look at the whole picture before stopping at the main subject.
7. The Aspect Ratio Grid
The final grid is a bunch of boxes inside of boxes with numbers on them, like 4×5, 5×7, and 8×10.
- How to use it: This grid does not help you make the picture look pretty. It helps you see what the picture will look like if you print it on real paper.
- When to use it: If your mom asks you to print a picture to put in an 8×10 picture frame on the wall, use this grid! It shows you exactly what parts of your photo will get chopped off when you send it to the printer.
Chapter 5: What If the Grid Won’t Show Up? (Troubleshooting)
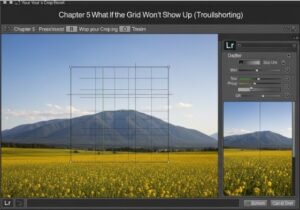
Sometimes, technology gets annoying. You might press the letter R to open your crop tool, and the screen is totally blank. There are no lines. You press the letter O, and still, nothing happens.
Do not panic! You did not break Lightroom. You just accidentally hid the grid.
There are two very easy ways to fix this.
Fix 1: The ‘H’ Key
The most common reason your grid is gone is that you tapped the letter H by accident. In Lightroom, H stands for “Hide.”
If you press H, it hides all your tool lines so you can see your photo clearly. Just press H one more time, and your grid will instantly pop back onto the screen.
Fix 2: The Tool Overlay Setting
If the H key does not work, you need to check your main settings. Look at the very bottom left corner of your big photo area. You will see a tiny menu called Tool Overlay.
Click the words next to it. A small menu will pop up with three choices:
- Always Show: The grid lines will never leave your screen while the crop tool is open.
- Auto Show: The grid lines will show up when you click your mouse to move the picture, but they will vanish when you let go of the mouse. (Many pros love this setting.
- Never Show: The grid lines are totally turned off.
Make sure this menu is set to Always Show or Auto Show, and your problem will be solved!
Chapter 6: Aspect Ratios (The Final Step)
Now you know how to change the grid and which lines to use to make your picture look amazing. But there is one last thing you need to know about the crop tool: the aspect ratio.
The aspect ratio means “the shape of the box.”
Is your photo going to be a tall rectangle? A perfect square? A wide rectangle?
Before you start moving your grid around, you need to pick the right shape for where your photo will live.
Look at the right-side panel, right next to the Crop tool icon. You will see the word “Original” with a little padlock icon next to it. If you click the word “Original,” a giant list of numbers will drop down.
Here is a quick cheat sheet for which shape you should pick:
- 1×1 (Square): Pick this if you want the classic Instagram feed look.
- 4×5 / 8×10: Pick this if you are making a tall, vertical photo for social media. This takes up the most space on a smartphone screen, so people are forced to look at it!
- 16×9: Pick this if you are making a thumbnail for a YouTube video or a picture to use as a desktop background on your computer monitor. It is very wide.
- Original: Pick this if you want to keep the same shape that came out of your camera.
Once you pick your shape, lock the little padlock icon! When the padlock is closed, you can make the crop box bigger or smaller, but it will never lose its shape.
Conclusion
Learning how to change the crop grid in Lightroom Classic might seem like a very small trick. It is literally just pressing the letter O, but the impact it has on your photography is massive.
By changing the overlay, you stop guessing. You stop just putting things in the middle of the frame. You start thinking like a true artist. You can use the standard grid to fix a crooked building. You can use the rule of thirds to make a balanced portrait. You can use the diagonal lines to make a fast car look like it is flying off the screen.
The next time you sit down to edit a batch of photos, do not just rush through them. Open the crop tool. Tap the letter O. Play around with the different shapes and see how they completely change the feeling of your picture.
Editing should be fun and creative. Use these hidden grids to unlock your full potential and make your photos better than ever before. Keep practicing, keep cropping, and keep creating!